In today’s increasingly mobile world, it seems like the productivity we have grown to associate with our desktop environments should start to migrate over to our mobile world. The Microsoft Excel app for the iPhone, iPad, and iPod touch appears to bridge this gap.
Microsoft Excel for iPhone
The Microsoft Excel app allows users to view, create and edit spreadsheets in this free version of the app with the familiar Microsoft Excel look paired alongside the iOS touchscreen experience.
The app provides the following Excel Spreadsheet features:
- Formulas, tables, charts, comments, PivotTables, sparklines, conditional formatting, sorting, filtering, and more.
- Same look to the spreadsheet, whether you are viewing it on the app or on a PC or Mac.
- Access Excel spreadsheets from email attachments, OneDrive, Dropbox, or SharePoint.
- If using an AirPrint printer, you can even print an entire workbook, a worksheet, or a specific range of cells to your AirPrint printer.
- Includes a special formula keyboard, which allows formulas and numbers to be entered much easier than using the standard keyboard.
- AutoSave feature ensures that your work will always be saved while on the go.
- Easy to share your Excel workbook by emailing the spreadsheet as an attachment, as a link to the file, or as a PDF.
The free version of this app provides a very useful experience for people who tend to frequently be away from their desktop. Additional features are available to be unlocked to qualifying Office 365 subscribers.
How to Use Microsoft Excel for iPhone?
What formulas can be used in the app?
Formulas that you would type into any other Excel spreadsheet can be used in the iOS app.
 How do I connect to OneDrive or Dropbox?
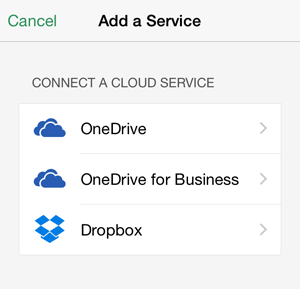
You can connect to services like Dropbox with just a click if you already have connected to the Dropbox app on your iOS device. If not, it’s a simple sign in to get connected. From the app’s “Account” screen, click the “Add a Service” button (note: you may need to log in to your Microsoft account in order to access this screen). From there choose OneDrive, OneDrive for Business, or Dropbox. Follow the remaining on-screen instructions to complete the connection.
 How do I edit a cell?
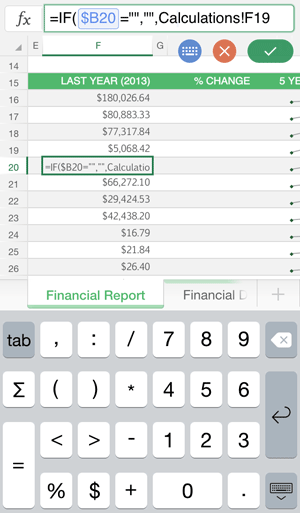
You can tap a cell to view the cell’s formula, but this won’t let you edit the cell yet. Double tap the cell you wish to edit, and you will enter the edit mode where the formula bar becomes editable. Click the red “X” icon under the formula bar if you want to cancel any edits, or click the green “✓” checkmark symbol to save your edits.
How do I switch to the formula keyboard?
When you are editing a cell, the formula bar appears at the top of the screen. Tap the blue keyboard looking icon directly below the formula bar to enable the formula keyboard. Tap it again to return to the regular keyboard.
How do I switch to another worksheet?
Just like the desktop version of Excel, the app has tabs along the bottom of the spreadsheet. Swipe along the tabs to find the worksheet you are looking for, and tap it to open it. Double tap the tab to edit the worksheet’s name.
Can I search in the Excel App?
To search for a particular word, phrase, or number in your workbook, simply tap the three dots at the top right of the app’s screen (when not in the edit mode). Then tap the “Find” option. At the top of the screen will display a search box that you can use to search through your workbook. If you tap the “gear” icon to the left of the search box, you can modify the search function to do any of the following:
- Find
- Find and Replace
- Find and Replace All
- Search in Workbook
- Search in Sheet
- Match Case
- Match Cell
 Can I edit a cell’s formatting?
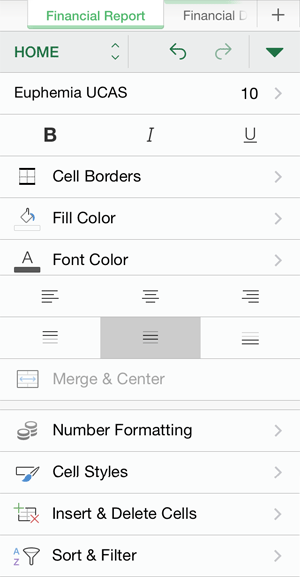
With the cell whose formatting you want to edit selected, tap the icon in the top row that looks like the capital letter A with a pencil in front of it. A range of formatting options opens up towards the bottom of the screen, including common formatting functions such as:
- Font
- Font size
- Bold, Italic, Underline
- Cell borders
- Fill color
- Font color
- Top, middle or bottom align
- Left, center or right align
- Merge & center (if multiple cells are selected)
- Number formatting
- Cell styles
- Insert & delete cells
- Sort & filter
How do I select more than one cell?
Using the drag handles, which look like dots on the top left and bottom right of the active cell, use your finger to drag the box around the cells you want to select. You can also tap on a row or column number or letter to select the entire row or column. You can also use the drag handles to select multiple rows or columns.
As of the time of this article’s writing, I have not found a way to select non-consecutive cells such as A1, B7, and D9 for example. Please feel free to leave a comment with more info if you find a way to do this.
How can I copy/cut/paste a cell?
To cut and paste, simply select the cell(s) you want to cut, tap and hold the selection, and drag it to where you want to paste it.
You can also tap the selection to bring up the standard iOS option menu, which provides options to Cut, Copy, Paste, Paste Format, Clear, Fill, or Wrap. After copying or cutting the selection, simply tap the cell where you want to paste the contents, and tap again to bring up the iOS option menu. Find Paste to paste the contents.
![]() What if I need to undo a change?
What if I need to undo a change?
Click the ↩ icon at the top of the screen in the green bar (third icon from the left).
How do I turn AutoSave on or off?
Tap the second icon in the top green bar, which looks like a piece of paper with circular arrows on it. Here you can select whether or not the file is autosaved, Change the name of the file, duplicate the file, restore from another version, print (if connected to an AirPrint printer), see the file properties, and get support.
How do I share the Excel file?
Tap the three dots in the top green bar as you did in the search instructions above. Here you can choose to email the file as a link, email it as an attachment, or copy the link to the file.
Note: copying a link or emailing a link to the file will only work if the file is already saved to either Dropbox or OneDrive.
How do I save my file?
If saving a newly created file for the first time, tap the second icon in the top green bar, which will allow you to change the name of the file (by default the file name will be something generic like “Workbook”). Tap the Name option. This will open a screen where you can give the file a unique name, and also select which folder in your OneDrive, Dropbox, or iOS device where you want to save the file to.
If you have the AutoSave option turned on, you do not have to save the file after every change you make, as changes are saved in real time. However, you can follow the steps above to save the file to another folder if necessary.