Sometimes you will copy and paste data into a worksheet from another file, a web page, or some other source that isn’t formatted the way you want it. Often times there is extra irrelevant data like row numbers or other miscellaneous information that gets added in when you paste the data. If the unneeded data is on it’s own row, you can delete every other row easily with the macro in this tutorial.
Delete Every Other Row in Excel
This tutorial will require you to use the Visual Basic Editor to create a macro.
In earlier versions of Excel (prior to 2007), click Tools > Macro > Visual Basic Editor.
In Excel 2007 or later, click Developer tab, and then Visual Basic in the Code group.
In the Project pane, right click your workbook > Insert > Module.
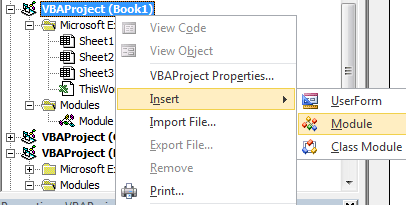
Next, double click the new module (usually Module1 unless there were already modules there) under your workbook. Paste the following code into the new module:
IMPORTANT: Create a backup of your file just in case, because there is no easy way of retrieving the data that is deleted after this macro is run.
Depending on your needs, you may need to change the Y = False to Y = True to delete the correct rows. False will delete the even row numbers, and True will delete the odd row numbers.
To use this macro, select the rows that contain the data where every other row should be deleted. The macro will only work on the selected range, so if you have other data outside of a specific range, it won’t be touched by this macro if you don’t select it first.
Also, note that the True/False setting discussed earlier refers to the actual row numbers in Excel, and not the 1st, 3rd, 5th etc. or 2nd, 4th, 6th etc. rows in your selected range. For example, if you want to delete every other row with Y=False and select rows 2-8, Excel rows 2, 6, and 8 will be deleted. If you select rows 2-8 with Y=True, Excel rows 3, 5, and 7 will be deleted.